There are a series of mini quests taking place in Crypts in Telepath RPG: Servants of God.
Crypt 1[]
East Ravinale[]
Has no minimal requirement for most advantageous completion.
Go into the library and walk through the right side, up to the Guard in the back of the Library, and choose the following options:
- Oh. Okay...
OR
- Why?
- Right...
Approach the Librarian (the woman standing directly in front of the Library entrance) and choose the following options:
- What did they do with all the books?
- If you won't stand up for the people's freedom to read, who will? (optional)
- You're right -- I don't want to get you in trouble.
- [Done.]
Click on the Librarian. (optional)
- [Done.]
Exit and then re-enter the Library, approach the Librarian, and choose the following options:
- No, thank you. [Open up the note and read it.]
- [Done.]
Click on the Librarian (optional)
- No, thank you. Not yet...
Crypt 1[]
Requires 8 Psy Power for completion.
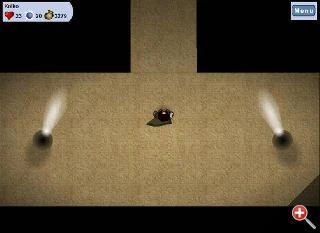
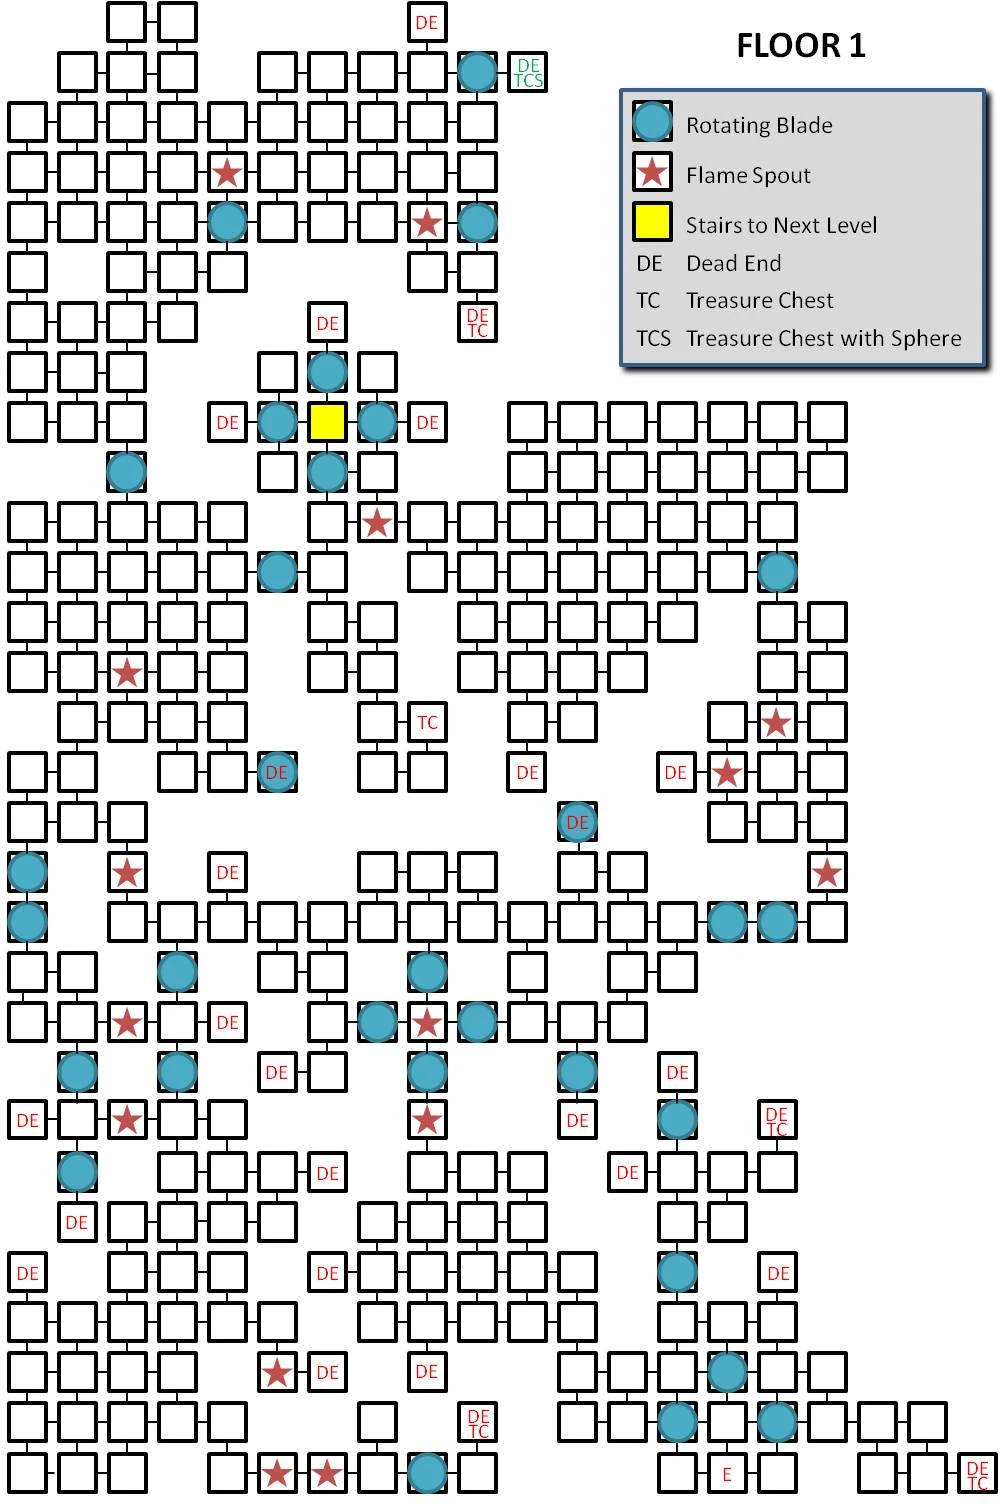
Ground Floor: Take the left fork and go to the end. Move the Hero as close to the abyss as you can, then click the lever and choose the following options:
- [Attempt to move it.]
- [Done.]
Go back to the crypt entrance, take the right fork, and go through the falling sand and down the stairs.
Floor 1: Move forward towards the two Desert Scorpions and defeat them in battle. Then, go to the skeleton and click on it, choose the following options:
- [Exmaine more closely.]
- [Exmaine it.]
- [Done.]
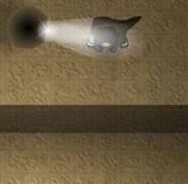
Walk forward until you reach an Owl Head sculpture. Go to the left (avoid tiles that have 5 dots on them: they're spikes and will diminish your health). Click on the rotating light pillar whilst standing directly to the right of the pillar, and choose the following options:
- [Done.]
Go to the end of the room and click on the chest. Choose the following options:
- [Open it.
- [Done.]
Go back to the Owl Head sculpture and into the room to the right. Stand between directly to the left of the light pillar, and click on it. Then, go to the bottom-right corner of the room and click on the lever, and choose the following options:
- [Pull the lever.]
- [Done.]
Now, a new pasage, previously blocked by doors, is open in the downward direction. Walk down from the Owl Head sculpture and repeat the "turning the light pillars towards the Owl Head" procedure twice. The position is kind of confusing, so follow this image:
Go back to the place where the Owl Head sculpture was previously positioned: it is no longer there, but a staircase has been revealed. Descend to the next level.
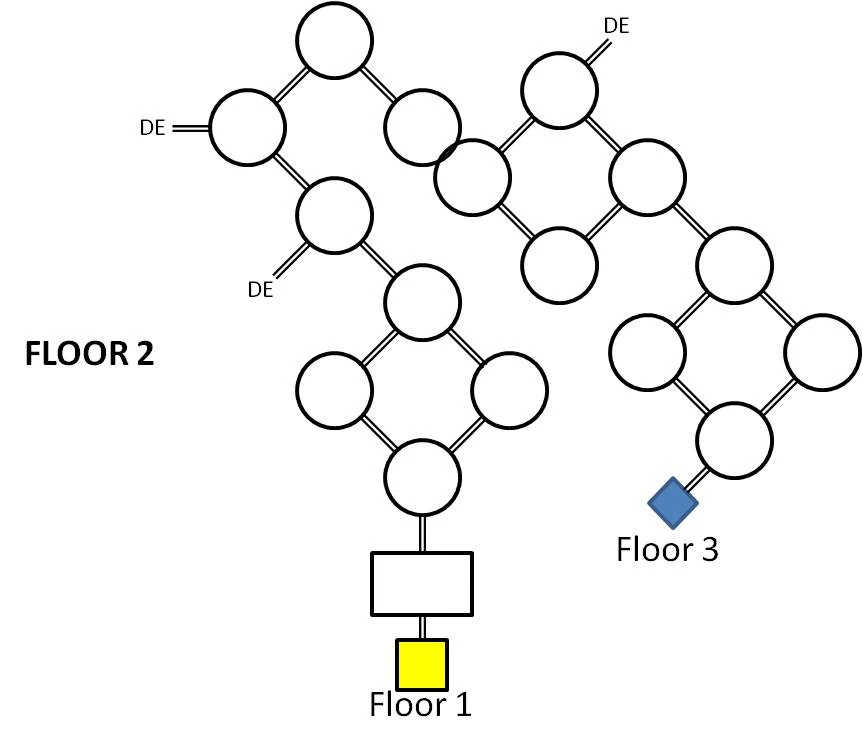
Floor 2: Go straight to the right and go down the stairs.
Floor 3:  Go to the top-left hand corner of the room and click on the chest:
- [Open it.]
- [Done.]
The Crypt map becomes available (go to "Menu," then choose "Maps").
Go to the lever and click on it:
- [Pull the lever.] 
- [Done.]
Go up the stairs.
Floor 2:  Go towards the Owl Head sculpture; there, ghosts are surrounding the pillar. Fight them and defeat them.
Go down to the Owl Head sculpture and go left. Make sure you're just outside of where the doors would close. Once there, click on the lever:
- [Attempt to move it.]
- [Done.]
(The doors will close behind you, but it is still possible to move the lever afterwards -- just come as close as possible to the door and click on the lever) Go towards the Owl Head and up. There are stairs in the upper right-hand side of the room; go up them, and go to the left hand side of the room. Now, either look at the Crypt map, or simply go through the wall on the left-hand side of the room and blindly find the passage down to the western room. Then, repeat thrice the procedure of turning the light pillar in the direction of the Owl Head sculpture (use this picture)
and go back to the place where that statue used to be. Descend to the next level.
Floor 3: Repeat the "turn light pillar" procedure twice by standing directly to the right of each of the two pillars. Slowly go towards the second room. Notice the timing of the dart throws. As soon as the dart wave starts, walk toward the centre of the room, then wait and observe the dart wave from the other side of the room, get the timing right and run towards the last shaft of light. Stand directly to the right of the last light pillar and repeat the turning procedure. Go back to the room with the staircase, dodging the arrows as you go; a new staircase is revealed. Descend to level 4.
Floor 4: Go to the chest and click on it (optional).
- [Open the chest.]
- [Take it.]
- [Done.]
The Blood Orb is now available (go to "Menu" and then click on "Orbs").
Go towards the big pile of books and click on it.
- [Done.]
East Ravinale[]
Enter the Library and approach the Librarian, choose the following options:
- No, thank you. [Contact her with the news.]
- Just think the words you want me to hear.
- Sure.
- We should--there is a huge cellar.
- [Done.]
You'll be teleported back to Baz's Manor (optional: go to the room with Fizooz and you'll find the pile of books stacked on the right side of the room). Go back to the Ravinale Library and click on the Librarian:
- No, thank you. [Open up the note and read it.] 
- [Done.]
Battles[]
Battle: Crypt Scorpions[]
This battle should be pretty easy. If your hero has a lot of psy power, then first use him to back stab the other scorpion. Use your other units to gang up on the two scorpions, with your hero. They both should go down in a turn or two, even if your hero can't destroy the first scorpion on his own.
Battle: Crypt Spirits[]
This battle should also be quite easy if you do this:
Gang up your whole team to the left; be sure to have Luca in your team.
Use your non-psy team members to attack the Lesser Ghosts in the back.
Use the Hero and Luca, along with Rahel using Bow 2, to kill the Ghost Knight.
Crypt 2[]
Ground Floor: Go left of the staircase, avoid the arrows and ground spikes back there and pull the lever in the far corner. Go back to the staircase, the sandfalls will have turned off. There will be two inscriptions under, which read:
The route to the head (The book room) is through the stomach (the first floor).
As you descend into the body of the dead (the crypt), Beware the feet (Ghost Pit)- they are unclean (have a ghost battle). Beware the bowels (the searchlight room and sword room)- for you are meat. Press the pores (the buttons on the first floor)- don't press your luck (read the walkthrough ).
Then go up the stairs to start the crypt.
The Stomach: There is a button next to the staircase, press it. The room will fill with roving ghosts. It is very hard to avoid them, but if they do hit you it's only one battle against 6 cryo-ghosts. After a single battle, all the ghosts disappear.
Now some of the blocks in the first floor will be gone. Next go down and take the first left. In the corner is another button, press it. More blocks are moved around. Go right and down until you reach the bottom right corner. Press the button there. Go up, left, and down in a giant U to reach the bottom left corner. Pressing this button will open a trapdoor that leads into the Ghost Pit. There is no other options at this point, besides this you are trapped.
The Feet: The battle is a little harder, against four lesser ghosts, 2 cryo ghosts, and 4 ghost knights. After the battle, walk right and down to the staircase. There is a gauntlet of arrow traps. Wait for two of the diagonally fired arrows and run to the lever. Pull the lever, it opens a staircase at the bottom of the gauntlet. Watch the arrows and wait for an opening, run down and right, into the corner. There is a light source and a lever, pull the lever and walk up the stairs you just opened up.
The Bowels (West): Go right. There is a chest between several spike indentations. They will not hurt you though, as you turned them off with the second lever in the Ghost Pit. Open the chest and recieve the map. Walk up, there is a circling spotlight, the rest of the room is dark. Walk right for a while, there is a secret passage. It will be pitch black, but move the mouse around until it turns into a hand, click and open the hidden chest. You get the yellow orb! Walk left until you are back in the bowels and get to the top of the room, snaking through. Watch when the spotlight goes over an area as there are plenty of spikes. The exit is in the top left corner.
The Stomach (Part 2): You are back on the 1st floor. Go back to the start and press the first button again. Walk down and left to get the second button once more. THIS TIME, go right, down, right, up, and right to get to the button in the right top corner. Press it. The east staircase opens, don't take it yet. Walk down and left until you get to the left bottom corner. Press this button, which opens a hallway in the east room, then go back to the east staircase. Take it.
The Bowels (East): Walk left. There will be a second room beyond the hallway. Watch out for the spinning swords and spikes. There is a chest in the top left corner that has 500 gold, and a button in the bottom left corner. Take the gold, press the button, and go back to the 1st floor.
The Stomach (Part 3): Walk left and down to get to the south staircase. Take it.
Esophagus: Go up and take the staircase.
Head: This room has two turning spotlights. Unless you have the yellow orb equipped, you won't be able toproceed. Go up and left to find a chest. Open it to get another 500 gold. Don't walk up anymore, there is a spike. Go back down and walk right. Watch out for the spike by the boulder next to the spotlight. Go right and up until you reach the top half. There is a spike in the middle of the right side, watch out. Walk up the stairs at the top of the room and you made it!
The Mind: Walk over to the chest, open it for the Violet orb. Grab the books and you will leave. Woohoo!
Battles[]
Battle: Vengeful Ghosts[]
Battle: The Ghost Pit[]
Kill the greater and lesser ghosts first, as they're the most mobile. Run away from the Ghost Knights. Have Set heal while Luca transfers PsP. Kill the Ghost Knights one at a time.
Crypt 3[]
Entrance / The First Floor[]
If you have 13 aptitude, you can move the levers fom a distance, making the puzzles somewhat simpler. First, you must walk around the plank-covered hole and go through the hallway to the left of the staircase (watching out for spikes that can pop up). In the hallway, you will find arrows flying from two spots on the walls. After they both shoot out twice, run past them and go up the stairs. you will find a room with blocks arranged around the floor, as well as spike tiles and a lever in the bottom-left corner. Push the farthest block on the right that you can reach to the right, and then keep pushing blocks on this side to work your way to the top right. Then, work your way along the top-left side, then on to the bottom-left to the lever. Pulling this will deactivate the permenant spikes at the north hallway. Proceed through there, then examine the tile. It will have a portion of a poem written on it. Head back out of here into the main room.
Next, head through the identical hallway on the right side of the main room. Make sure you watch out for the arrows shooting from the sides, and follow the sam e pattern as the opposite hallway. You will enter a room with blocks going down a narrow hallway to a wider room, but the blocks are blocking your way. Move the first block on the left up, then move the first block on the right up twice.
Now that you are in the larger area, go 1 space to the right, and then move the block directly north of you up. Then go 1 more space to the right, and push that block up once. Go 2 spaces left, then push the top block up. Push the block to your left 1 space to the left. Move 1 space left, then move the block below you down 1 space. You should be able to reach the lever. Pull it. Then go 2 space s above the spike tile, and move the block to your left 1 space left. Then go 1 space up, and move the block to your immediate left 1 space to the left. Move left 1, then push the block above you up. You should be able to pass the spike tile that is now permanently down. Read the tile which is located past the spikes. It will have the other half of the poem. Go back to the main room. Go through the center staircase.
You will find another block puzzle, with a corpse in the top-left hand corner of the room. Move the farthest right block you can reach all the way to the right. Next, move the block above you up once. Move the block above that one to the right until you can reach the door. When it asks you what air is, type "Death" in the box. The door should open up to a hallway that leads to a staircase taking you to the second floor.
The Second Floor:[]
When you arrive on the second floor you will see two blocks and if you make your way left and right first you will see stairways but they are blocked with spikes, so be patient and first deal with the two blocks. Follow the instructions to push these blocks. I will use the following abbreviations.
PU - push block up. PL - push block left, PD - push block down, PR - push block right.
MU - move up 1 square, etc.
Now start pushing the blocks as follows:
PU the block on the right. MU, PL, ML, MU, PL, ML, PU, MU, PL, ML, MU, PL, ML, MU, PL.
Now you should arrive at an open area. Proceed to go up and aim the lamp you see approximately 55 degrees above horizontal in the counterclockwise direction. This is towards the direction of the owl statue which you can find by going right and up by pushing the block on the top most part that you can reach: PR, MR (call this LOCATION X. You will need to come back here later), MU, PU, MU, PU.
After aiming the lamp to the owl statue exit down the staircase you came from and re-enter. This time start with the left block and proceed as follows:
PU, MU, PR, MR, MU, PR, MR, PU, MU, PR, MR, MU, PR, MR, MU, PR, MR, MU, PU, MU, PU, MU, PU.
You should arrive at an open area. Now go aim the lamp you see about 55 degrees above horizontal this time from the clockwise direction (towards the statue). Doing this you will lower the spikes that blocks the right and left staircase in this room. Make your way to the right staircase and go downstairs. (If you go down from the left staircase everything will be dark and you will be forced to leave). Now you have to push a bunch of blocks.
New abbreviation: PB - press square button.
Follow the following instructions when you arrive downstairs:
Start with the block on top: PR, MR, MD,PR, MR, PR, MR, PU, MU, MR, PU, MU, PL, ML, PU, MU. Select [Scan for thought impressioin.], and then [Continue Scanning]. This should tell you that the letters in the image is the word "indication". Make note of "indication" and the image that has indication written in the old alphabet. I suggest you make a table with a,b,c,...,z on a piece of paper to match each letter with the corresponding letter in the old alphabet. Right now you should know the letters of m, e, d, i, t, a, i, o, and n from "meditation" in the old alphabet. Exit to the stairs.
Start with the block on top: PR, MR, MD,PR, MR, PR, MR, PU, MU, MR, PU, MU, MR, MR, PR, MR, MU, PR, MR, PR, MR. Stop here, call this location 1). You will need to come back here later.
Now from where you are: ML, MU, PL, ML, MU, PU, MU, and PB. Select [Scan for thought impressioin.], and then [Continue Scanning]. This should tell you that the letters in the image is the word "indication". Make note of "indication" and the image that has indication written in the old alphabet. I suggest you make a table with a,b,c,...,z on a piece of paper to match each letter with the corresponding letter in the old alphabet. Right now you should know the letters of i, n, d, c ,a ,t, and o from "indication" in the old alphabet.
Go back to 1) and: PD, MD, PR, MR, MD, PD, MD, ML. Stop here, call this location 2).
From where you are: MR, MR, PR, MR, MU, MR, and PB. Select [Scan for thought impressioin.], and then [Continue Scanning]. This should tell you that the image is the word "Reversal". You now have the new letters r, e, v, s, and l in the old alphabet. Write this down if you made a table.
Go back to 2) and: PD, MD, ML, PD, MD, ML, PL, ML, MD, PL, ML, MD, PR, MR, MD. Now click the red lever and select [Attempt to move it.] and [Done]. Go back to the staircase you came from and go back up. Now go to the staircase all the way on the left side of this room and go down the stairs. There should be a "circly" light in this room now for you to see. When the light shines in your direction you should see two blocks. Start with the top block and proceed as follows:
PR, MR, MD, PR, MR,PR, MR PU, MU, PR, MR, PU, MU, MR, MR, and PB. Write down the words in old alphabet that you see in the image. Match these words in the table you created with the letters that you know. (Ofcourse you don't know all letters in the alphabet in the old alphabet so this is where guessing is required). You should have something like
"I t c e a s e s t o e x i s t i n d a r _ n e s s" where _ means a letter you don't know in the old alphabet. (i.e not on your table).
from this you should immediately deduce that the message is
"It ceases to exist in darkness".
Add any new letter that you now the it in the old alphabet to your table (in this case just "k").
Now from where you are: PR, MR, MU, PR, MR, PR, MR, PD, MD (call this location 3)), PR, MR, MD, PR, MR, PR, MR, PB.
Again match the words in the image with the table you created you should get something like this (Again I suggest you write the words down):
"_ o _ _ i t _ i n l i _ i t s"
Ok this time you probably can't guess it so lets move on. From where you are go to 3). Now:PD, MD, ML, PD, MD, ML, PD, MD, ML, PL, ML, MD, PL, ML, MD, PR, MR, MD, MD, MR, and PB. Match the words in the image you see with your table and you should be able to get something like this:
"_ _ a t' s r i _ _ t is a l l t _ a t' s l e _ t. "
Now if you written the words in the image down and match their letters in your table you should be able to deduce that these two messages are "you within limits" and "what's right is all that's left". (In theory, the word "you" could also be "boy" or any other 3 letter words with the first and 3rd letter in the word from some old alphabet not known in your table.)
Now make your way back upstairs and go to LOCATION X. When you arrive here go down to the door and click it. You should be able to figure out what to type here from the 3 secret messages: "It ceases to exist in darkness", "you within limits" and "what's right is all that's left." If you still can't figure it out click this: hidden message. The word is there. After you open the door, go down the staircase to the basement. Also it is advised that you keep the table (if you made one) as it is useful in opening hidden treasure chests that require you to enter secret messages in order to open them around Cera Bella.
Basement[]
When you arrive here, go left and click the treasure chest and then click [Done.]. Now go right and down. You will meet some ghosts you need to destroy. It's the only battle in this crypt. (See battles.) After you win (hopefully), make your way down and left and then up and you will arrive in an open rectangular region with arrows. On your way here you will see a bunch of stairs. Ignore them; they are traps with spikes on them. Make your way to the northeastern corner of the rectangular region, avoiding arrows as best as you can. Now go up into the secret passage and make your way to the secret staircase and go down. Congratulations, you completed crypt 3. Open the treasure chest to get the azure orb and click the pile of books to return to Ravinale. Go back and talk to the librarian in the Ravinale Library until she adds Crypt 4 to your map.
Battles[]
Azur's Guardians[]
A battle with 4 ghost knights and 4 ghosts. Award: 540 Gold!.
Crypt 4[]
Crypt 4 includes enemies that require extensive training from the player to win. Getting gold from the treasure chests and fighting battles in the Great Forest can efficiently boosts your team's potential.
First and foremost, focus on Duvalier's stats. It is recommended that you get at least 40 Psy Power and 30 Psy Defense. Area-of-effect skills are also going to be quite helpful.
Labyrinth[]
The entrance is at the bottom-right of the map on the 'E'
Floor 2[]
Battles[]
Lost Souls[]
It's the name of battles that occur when you randomly encounter ghosts in Floor 1.
The Lost Regiment[]
This is the final battle that you need to face in order to get to the books and the crystal orb.
Presentation[]
Basically,you have to get to a space nine tiles in front of you.The problem is the multitude of ghosts,the wall of cracked boulders,and the spaces favorable for the enemy to ambush you.Also,the space there is guarded by a greater ghost.There are also treasure chests in corners but you may want to focus on the battle.
Strategy[]
This is a tactically hard battle even though the foes are ridiculous.You have to blitz trough the central path,but you can't just get to the special space because you are blocked by a wall of cracked boulders.It is recommended to take only the characters that are well trained as it is full of unwalkable spaces and your friends may encumber themselves or your sniping points.Secondly,you will want a short-ranged attack (especially this,but watch out in friendly fire is on) like Cryo Cross or a long-ranged attack like Light Bomb to either break the gate or soften the enemies ahead. Remember, this is an attrition battle,the main danger is losing your psy points,thus you have to win quickly.
After you have beaten the battle, you need to head south and go downstairs. There is a chest containing the crystal orb. Open it, then you are ready to leave the Crypt with the books.
Congratulations! You now own all the books. You can exchange them for troops at the Psy Academy, if you speak with Dean Anya. Mind you, this will later upset the Librarian. On the other hand, the orbs that you obtained in the crypts go a long way from now on...